 just one more day in the jerky factory as i dehydrate the last batch of raw jerky. 10:30. i checked the time so i'd know when to stop the box fan. the air filters are starting to look a little worn, stained with excess marinade. i might think about replacing them if i ever make jerky again. the screens are still usable though, plastic maintains better than fibers. even though i managed to get a paper towel stack of only 6 layers of jerky, it was enough to fill both layers of the DIY dehydrator.
my aunt lili asked me once if i like beef jerky so much why i don't just buy a dehydrator. my homemade beef jerky is all about doing it on the cheap. even with a real food dehydrator, i'd still run into the problem of stinking up the house with the smell of drying jerky. besides, a box fan dehydrator - besides being inexpensive - gives me far more dehydrating area than a typical dehydrator.
the took the motorcycle to the cafe to drop off two jars of jerky i made last night. i felt a little guilty giving them away because they weren't very good. not enough flavor and far too dry. i told my mother the batch i was drying today would be far more delicious. my mother packed me some leftovers for lunch before i returned home. i also showed my father some jacket cover ideas for my great uncle's book.
i saw my neighbor ed hanging out in front of his house and went to go chat with him. nearby somebody had moved out and left a pile of curbage outside. the person must've been a nurse in training because there were a lot of nursing books and study guides. i took a pair of canvas grocery bags and a spray can of kiwi performance fabric protector. ed was working on his $400 honda accord, popping the hood open to check the fluids. he has the most colorful stories, i'm not sure how much of it is true. like the time the motorcycle shop asked him to be a bike model. or all the properties he own in colorado and florida. he showed me some recent vacation photos on his iphone (even he has an iphone?). he was telling me about this girl he used to know who rode motorcycles on the ice in new hampshire before they kicked her out of town. he said he'd keep an eye open for a 27"x1-1/4" wheel with a 5 ring cassette.
 i finally came home to eat lunch. i went out again to the dollar store to get some cotton swabs. i also bought a 10 ft x 20 ft roll of clear plastic sheet, for making cold frames to grow a few things during the fall (now that it's officially september).
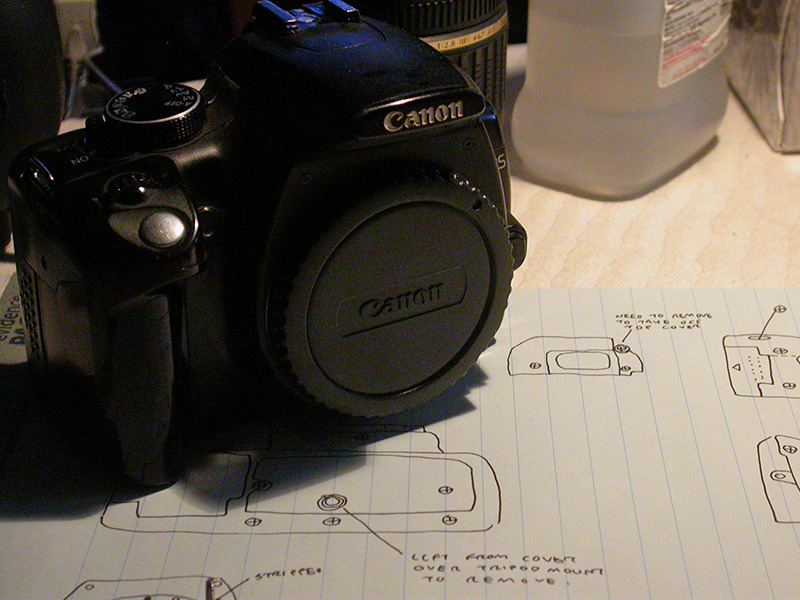
the rest of the day was spent taking apart my canon SLR camera to try and fix the broken shutter button. the closest online instruction for taking apart a 350D was actually for a 450D. a youtube video of a 30D disassembly was also helpful (although for a different class of cameras). finally, another video showing a 450D disassembly for an infrared photography conversion came in handy as well; it wasn't exactly repairing the shutter button but that video went slower so was easier to follow. i started at 2:30 and didn't finish until 6:00 (taking it apart and putting it all back together again). it took so long because i was being careful, but i think the next time i disassemble the camera should go a lot faster.
 |
 |
 |
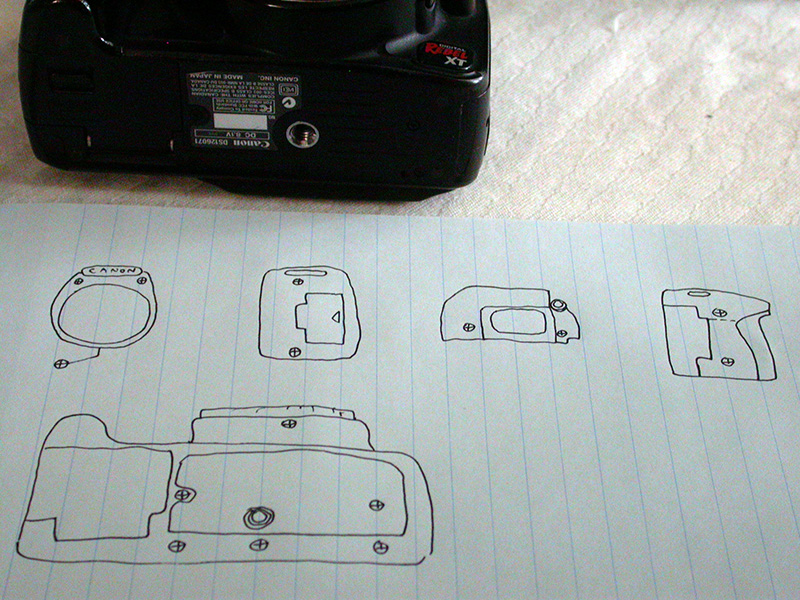
i started by diagramming the location of all the screws i'd be removing. i ended up removing a total of 22 screws. each one i took off i'd put it on the diagram so i knew exactly where it should go when it came time to putting everything back together again. i also had some cotton swabs and alcohol to clean out any dust i found inside, which turned out to be a lot (this is a 5 year old camera after all).
 |
 |
 |
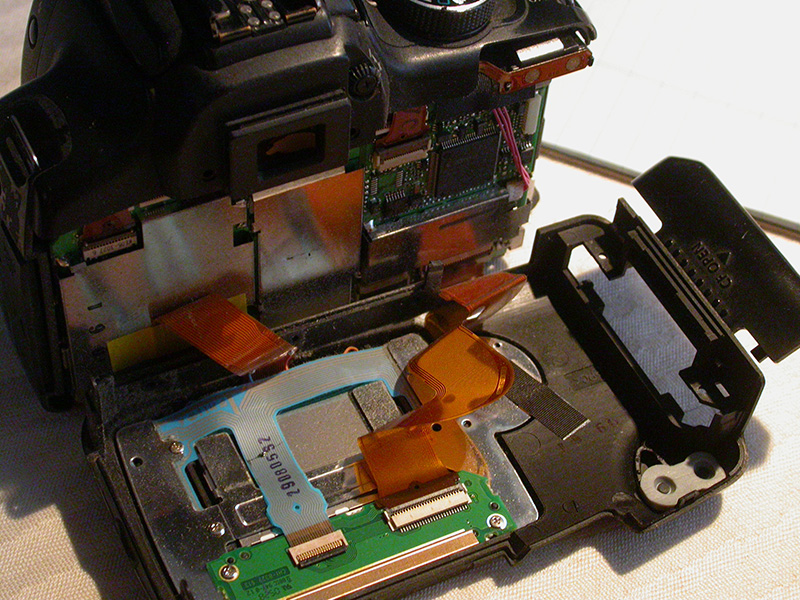
i removed the back cover first. it was attached to the main camera body by two ribbons that i disconnected. i put the back cover (which included all the guts for the rear LCD display) in a clear plastic box to keep off the dust.
 |
 |
 |
the goal was to take the top cover off, which included the housing for the shutter button. next thing to come off was the front cover. unlike the back cover, the front cover doesn't have any electronic components, it's basically just a plastic shell. the front cover is tricky to take off because i needed to pry it off the tripod mount on the bottom of the camera.
 |
 |
 |
what i didn't realize is i didn't need to disassemble the lens mount (the silver metal ring) in order to remove the front cover. i found out too late and ended up stripping one of the tiny screws holding the lens mount in place (3 out of 4 should be enough though). i also for a time lost the tiny spring holding the lens lock pin in place. it fell inside and the camera and no matter any amount of shaking it wouldn't come out. finally i saw it on the table, must've came out when i wasn't looking.
 |
 |
 |
with both back and front covers removed, it was just a simple matter of wiggling off the top cover. actually not so simple, because i didn't realize the top cover was connected to the main camera body by two short ribbons. i ended up just yanking them from their sockets. i hope i didn't damage anything!
 |
 |
 |
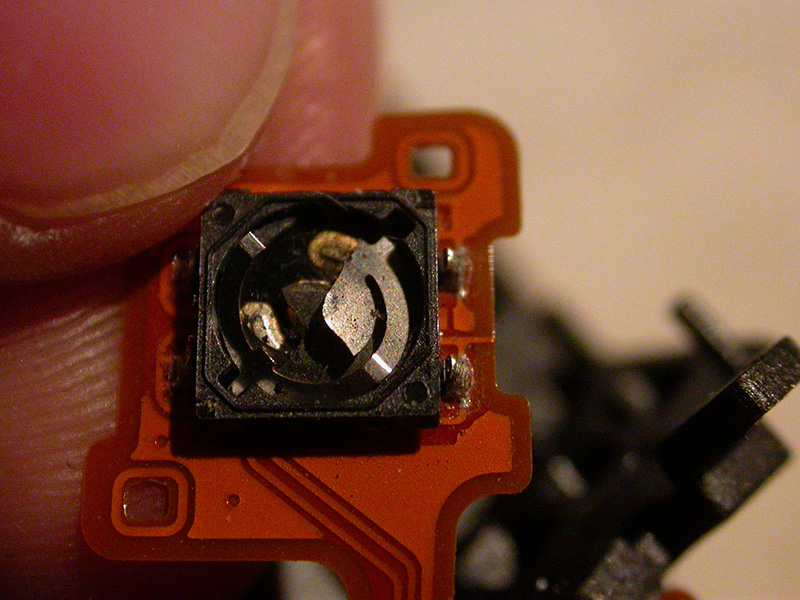
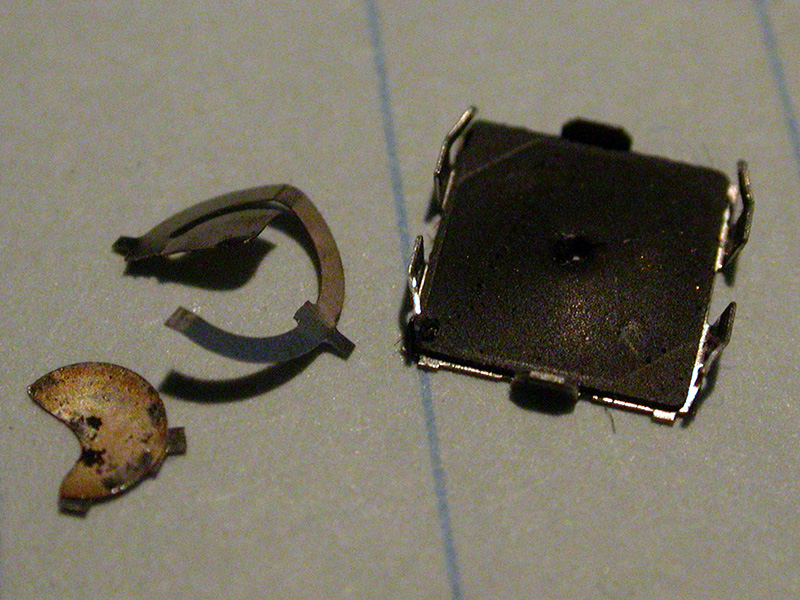
2 more screws were removed (so actually 24 screws total) before i managed to free the shutter button and main dial assembly. and there it was: the shutter button switch. right away i could see something was wrong. the rubber diaphragm had a hole in it from me having pressed the button on it a million times. using the tip of a safety pin, i pried off the metal bracket of the switch. inside was a mangled piece of trigger wafer. normally it has a crosshair pattern but this one had broken into several pieces. it even looked like there was some kind of short circuit as some point because there looked to be some scorch marks (maybe from water getting inside).
 |
 |
 |
by that point i knew this wouldn't get fixed today. i needed to get a replacement part, which wouldn't arrive until next week at the earliest. i could leave the camera disassembled, or put it back together again and see if it still works. the replacement part would arrive soon enough, but in the meantime i could still take photos with the camera. so i put back the camera.1
 i put in a battery and turned on the camera. it wouldn't start. oh crap, i must've broke something! i figured the culprit was most likely the 4 ribbons i had to remove, so i made sure they were on securely. i tried turning on the camera again. it still wouldn't start. could i have damaged one of the ribbons when i yanked out the top cover? maybe the camera doesn't like the broken trigger wafer pieces? i checked the ribbons once more. finally it started! whew, disaster avoided.
i tested the camera some more: zooming, switching lenses, using the flash. everything worked the way it did before, except for the halfway focus, which was still broken. i was hoping for some miracle that would magically fix the camera but that obviously didn't happen. in taking part the SLR and putting it back together again, i might've indadvertedly fixed the internal flash. often times when i pop open the internal flash, it'd hang and give me an ERROR 99. but now it doesn't do that anymore, so i must've fixed it somehow.
so i went online and did a search for "canon 350D shutter button replacement part." a company in china was selling them in bulk for $5 a piece with free shipping (cheaper the more i bought). that was the cheapest price i saw but it'd take weeks for it to arrive from china. i needed a fix fast! so i went onto ebay. one seller had it for $10 with free shipping, another for about the same price but with $2.50 shipping. i ended up buying from the slightly more expensive dealer just because the shutter button switch looked exactly like the one i have. better to have something be compatible than buy something that might not work. it's scheduled to arrive next tuesday or wednesday but i'm hoping it gets here even sooner, like saturday or monday (dealer is based in st.louis).
it's kind of fun taking things apart, and even better to put them back together again and have them still work. disassembly is a learning experience: i feel like i know a lot more about my camera than i used to. who knows how much i saved by repairing the shutter button myself. i don't want to get ahead of myself though, the camera isn't actually fixed yet, and i may still need to bring it to the repair shop if the replacement part doesn't work. but i'm optimistic and mildly confident that this little drama will have a happy ending.2 i feel a lot better now than i did earlier, when i was still in the dark about what exactly was wrong with my camera.
 i stopped the fan dehydrator around 6:00. even though it'd been blowing for less than 8 hours, an inspection of the jerky revealed that they were already pretty dry. maybe because there was less meat this time, it dehydrated everything faster. i did notice the topmost filter was bowing upwards during the drying process, like there was too much wind blowing. the lesson i learned yesterday is not to overdry the jerky. i gathered up all the pieces then put them into the oven, baking for about an hour. once again, the key was not too dry.
 the final result was pretty good. the sichuan peppercorns definitely gives the jerky a special zing. the vietnamese hot sauce makes it spicy, the pepper flakes some additional spiciness. even the sweetness of the honey i could faintly taste. i don't really notice the rice wine though, but it didn't hurt to add it in the marinade. this batch of jerky has reinspired me to jerky making again! before my roommate arrives i should make one final batch, using 4 drying racks and double the amount of beef.
for dinner i heated up a frozen brick of store-bought lasagna then had some watermelon for dessert.
1 though it took me nearly 4 hours to take apart and put back the camera, i estimate i can probably disassemble it now in about 10 minutes now that i've done it once.
2 i'm actually a little disappointed that i might be able to fix the camera on my own. if i was forced to take it to the shop for a more expensive repair, i would've most likely bought a new camera to replace this old one and save the fixing for some other time. a new camera is still in my future, but now i can wait for the price to come down a bit (like closer to the holidays).