with nothing planned for the day, the first thing i did this morning was to continue working on my bicycle.
cassette overhaul:
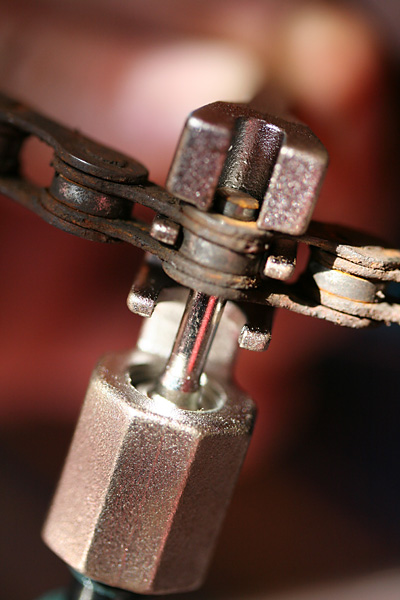
i'd already removed the rear wheel last night, all i needed to do was to remove the cassette. this gave me a chance to use two of my new bike tools: the chain whip and the freewheel remover.  the chain whip grabs a hold of the cassette (otherwise the cassette would spin on the wheel; you could possibly hold it by hand,
  but the teeth would dig into your flesh long before the lockring came loose), while the remover is just a socket that fits inside the grooves of the lockring. the first thing i did was to remove the rear hub, which involved unscrewing the nut, spacer, and cone (on the left side) to remove the long threaded axle. the assembly on the right side was tight enough that it couldn't be screwed off easily (by design or accident, i don't know). inside the hollow center were ball bearings held in place by old grease. i picked them out and put them in a safe place to be put back later.
 i still needed a wrench of some sort to turn the freewheel remover tool. unfortunately my one adjustable wrench couldn't open up wide enough.
  i tried using the tongue & groove pliers, but i couldn't get a good hold and i was afraid of damaging the special socket. i reached an impasse, before remembering i had a set of large-sized socket wrenches. i found one that fit the freewheel remover perfectly and managed to loosen the lockring.
 |
 |
 |
 |
i read when the cassette lockring first comes loose, there's a sickening crunch, and sure enough, i heard it. i took the loose cassette and a few other parts and soaked them in some degreasing solution. the satisfying froth of white foam told me it was working. the freehub still remained on the wheel. i couldn't remove that because i didn't have a 10mm hex wrench (or maybe i do, i never bothered checking). the freehub looked to be in good enough shape that i just wiped it down with some WD40.
 |
 |
 |
breaking the (old) chain:
 |
 |
 |
the chain tool and a strand of replacement chain were the first bicycle stuff i purchased a while back. i held off on doing any chain work though because i wanted to replace the crankset as well, which involved waiting for the parts and tools to arrive. so it was pretty exciting to be finally able to use the chain tool. breaking the old chain was actually pretty easy. i pushed the pin all the way through. i decided to soak the chain as well even though i wasn't going to reuse it (no use keeping a dirty chain).
intermission:
 |
 |
 |
i finished the rest of my mexican tortilla soup for lunch. by then my hands were coated in grease and the kitchen garbage was full of discarded paper towels stained with various bicycle grime. once i finished eating, i went back into the kitchen/dining room to continue my bike work.
reinstalling the cassette:
 putting the rear hub and cassette back involved returning the loose ball bearings. unlike the bottom bracket, the bearings in the hub don't sit in a cage but rather just held in place but a thick layer of grease. i squeezed the tube of grease into the "cups" and then smoothed
  it into place with my finger before packing in the ball bearings one at a time. once that was done, i pushed through the threaded axle and began to screw on the cone. i noticed something was wrong: the axle on the cassette side was much shorter than i remembered. so short that i wouldn't be able to reinstall the derailleur guard. confused,
 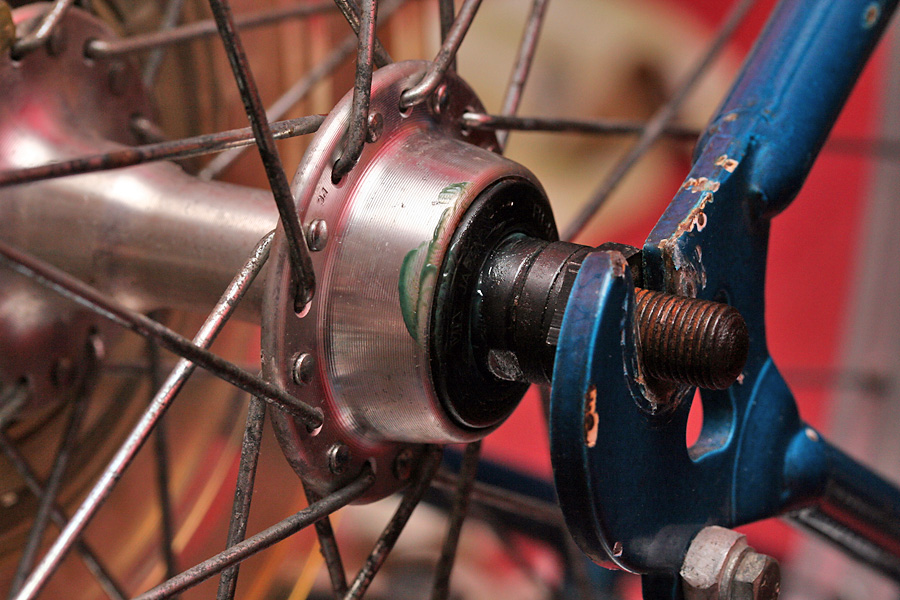 i went back to some of the photos of the bike i took earlier and realized i'd inserted the axle in the wrong direction (thank goodness i was meticulously photodocumenting my every step!). i reversed the axle (making sure none of the ball bearings fell out) and everything was okay again.
reinstalling the bottom bracket:
with the rear wheel all ready to go, it was time to put back the bottom bracket and the new crankset. since i couldn't remove the fixed cup (the one that's on too tight and many sources recommend to either take it to a bike shop, use a stationary vise, or not bother taking it off  if i'm not going to be replacing the it), i applied the grease slowly by putting some on my finger and poking around the inside rim of the fixed cup. i checked my status by going to the opposite side of the bracket shell and shining a flashlight. i then greased the other (adjustable) cup - coating the inside as well as the threads - and then 2 caged ball bearings. with one cage dangling from the spindle, i pushed it through the bracket shell so it was pressed up against the fixed cup on the other side. on the open end i put the caged bearings inside the adjustable cup and screwed it back onto the shell with the pin spanner followed by the lockring.
new crankset installation:
putting in the new crankset was probably the easiest thing i did all day. with the bottom bracket in place, it was just a simple matter of putting the pieces into the square tapers, screwing them into place, and adding the end caps. i also threaded in the foot pedals.
new chain installation:
 i was a little nervous about putting in the new chain. i knew i'd have to shorten it, but i didn't want to accidently make it too short. different sources were telling me different things as to how long i should make the chain.
  i started by threading the new chain through the 2 derailleurs and then onto the biggest chainring and the biggest cassette cog. the chain length was already long enough that it was pulling on the rear derailleur to a full vertical position so i figured maybe i
  didn't have to shorten the chain after all and linked the 2 chains together. this KMC chain i got ($12.99) came with a pair of adjustable links. this is the way all chains should be built, with none of that special one-time-use linking pins found in other brands like shimano.
everything was well until i shifted out of the biggest-biggest gear ratio. that's when the chain began to sag, which meant the chain was still too long. since none of my bike repair books properly told me how long to make the chain, 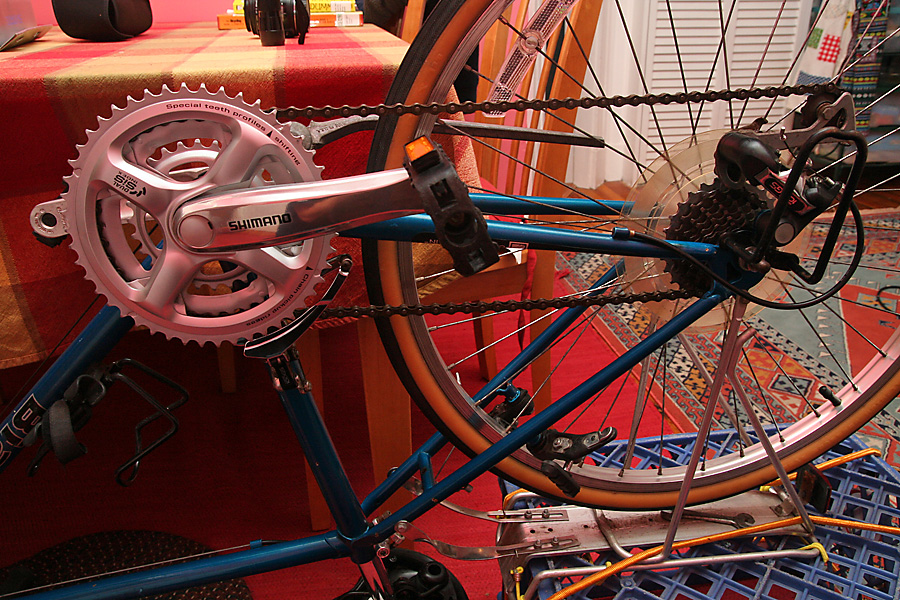 i went online and found a sheldon brown page that properly explained a chain shortening technique. basically, i hook the chains back onto the biggest chainring and cog, but bypassing the rear derailleur. i then thread the other end of the chain onto the largest chainring as well, and where they meet is where i should shorten.
  i did what the article said but soon found out that the two link ends were mismatched, and that i needed to remove one more link, thereby making my chain 1/2" shorter than recommended. i figured 1/2" difference isn't too bad, that the chain would eventually lengthen over time due to wear, and that i could always add a few links (i did that accidently, when i thought a particularly stubborn link was one of the adjustable links).
new chains come pre-oiled, so by the time i was done by hands and arms were back to being dirty. but that was the end of it, and i took a shower to clean myself up completely.
my roommate came home late, around 10:00. by then i'd already had some chinese dumplings for dinner and finished watching my stories (double episodes of dollhouse keeps getting better and better but probably because this is the last season). he was back to speaking chinese with me again (see how it easy it is when two people speak the same lingo?). we had a brief discussion about the weather, which is pretty much the only thing we can talk about since we know nothing about each other. it was our longest conversation yet. he was excited to see snow, said he hadn't seen it in a while, and told me that they don't get a lot of it down in los angeles (december understatement of the month award). my only regret is my last roommate couldn't be here to see the blizzard, because that was one of the things on his to-see-in-boston checklist. he even brought a pair of heavy snow boots which he never got to use. maybe i'll e-mail him a photo!